A few months ago, in conjunction with the release of Visual Studio 2012, Microsoft also released a hosted TFS (Note: this hosted service is called Team Foundation Service; Team Foundation Server is the thing you install onsite.  I’m going to call Team Foundation Service “hosted TFS” for brevity and clarity). This is kind of the third version of hosted TFS, which in Microsoft-land means it’s pretty good. True to form, VS 2012 is pretty good, and in contrast to previous versions has a good focus on agile teams. I’ve had the opportunity to use this for well over a year now, and I’ve seen hosted TFS grow into something you need to look at before you deride it. A wise move on Microsoft’s part is that hosted TFS is free for teams up to five, so you can explore and use at no cost.
Perhaps the greatest downside to TFS is that you were completely locked in to the TFS version control methods. The displeasures with this were great in number. Git, especially Github’s implementation, gained popularity in enterprises because of its distributed nature and ease of collaboration. Microsoft’s first foray to combining the features of Git and TFS was git-tf, which presented a git-like overlay onto TFS repositories.
Just this past week Microsoft dropped the bombshell that Git was a first class choice for version control in hosted TFS (read Team Foundation Service updates – Jan 30 or watch Git Support Added to Visual Studio and TFS). Woah. All the planning and tracking features of TFS (including the scrumboards) and the DVCS workflow of Git, in one offering.  Right now, Git is a feature in hosted TFS only; it’s planned for TFS but no timetable has been announced.
Also released was the CTP of Visual Studio 2012 Update 2 (VS2012.2) (see also Git init VS), which adds git support directly into Visual Studio 2012. Warning—do not install this update if you have existing TFS repos. There are several reports of it corrupting existing TFS repos. You might want to sit this one out, and keep your eyes peeled for a future version that won’t kill your existing repos. Stay tuned for updates and more information. This will be fixed soon, I’m sure. In the case of my team at the day job, we are connecting to TFS 2008 with VS 2012, which is not a supported scenario (even though it seems to work fine for us).  This is a known issue, see the compatibility matrix at Compatibility between Team Foundation Clients and Team Foundation Server.  If you’re using TFS 2008 or earlier, skip this update.  Otherwise, you’re apparently fine.

Using Git in Hosted TFS
For more information on using Git in TFS with VS 2012, see Getting Started with Git in Visual Studio and Team Foundation Service, or the hosted TFS docs at Visual Studio with Git. I have not installed the update, so I’m going to use Bash for this walkthrough.
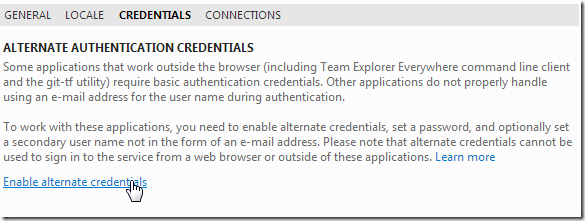
Your Windows Live Id can’t be used by VS or any of the other tools, so you have to create an alternate credential first. Once you’ve logged in, click on your user name in the upper-right corner and choose “My Profileâ€:

Then select the Credentials tab, and click on “Enable alternate credentialsâ€

Enter a secondary user name and a password—only one is allowed per account.

You’ll enter these credentials a little later when you clone the repo.
Next, create a new Team Project with Git:

Give a name, a description, a Process template (project tracking style), and choose Git as your version control. (Note: As I later found out, don’t put spaces in repo names. Not only is %20 a pain to remember and type, but VS appears to get confused with where it put the Nuget packages. I kept getting all kinds of errors when trying to build the project. Fortunately, it was a demo only.)

TFS will then create your project (they are certainly optimistic!):


If this is a new project, create a folder where you want the project files to be. If you have an existing project, you can work with that, no problem. Either way, open Git bash and navigate to your working folder. To clone a new project, issue the following command:
git clone https://<accountname>.visualstudio.com/defaultcollection/_git/<repo>
A couple things to note—since this is a URL, remember to HTML encode the repo name if you have spaces (e.g., repo%20name). Also, TFS projects are arranged into collections. If you haven’t created a collection, use defaultcollection in the path. If you’ve created a collection, use that. If you have an existing repo, use git init rather than git clone. You’ll be prompted for a username and password, and this is where you enter the secondary credentials you created earlier.

Now let’s see how this all works. Open up Visual Studio and create a new project in the folder you cloned into. Once the project is created, switch back to Bash and list the files. You can see you’re working in the master branch. A status check shows your new files.

If you try to add your files, and get an error like below, there is a simple fix:

You probably need to change the handling of LF and CRLF; check this with git config core.autocrlf. True means that line endings will be changed on commit/checkout. What you do depends on the systems your team members are using; there is a good discussion at http://kernel.org/pub/software/scm/git/docs/git-config.html. If everyone is using Windows, you can set this to false and line endings will remain unchanged.

Add your new files and commit them. If you’re new to Git, this commit will save the new files in the local copy of the repository. Now, you can push the files to your repo:

Looking back in TFS, this is how we see the repo:

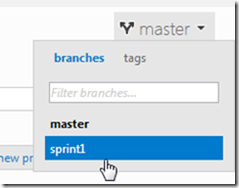
Let’s take a look at something basic—branching. Create a branch (I called mine sprint1), then make a small change to a file. Commit the changes, and push to TFS (remember to use git push origin sprint1).
Looking back in TFS, we switch branches with a dropdown list on the far right:

After switching branches, you can select the history tab and see the history of the branch.

Clicking on the message for one of the commits brings up the commit changes:

Drilling down in the Source Explorer to the file where you made the change, you can choose the compare tab and see the diff between commits.

This view can also be changed into an inline view:

Conflicts are resolved locally, before pushing to the repo. You do this in whatever client or tool you’re using.
TFS vs. Github – a comparison
In the table below, I’ve attempted to compare the major features between Github and Git in TFS. It’s far from complete, and I’ll happily make corrections or add more comparisons if you leave a comment. I’m a light user of Github, I actually use Bitbucket for my side projects.
| Feature |
Github |
Hosted TFS w/ Git |
| Forking |
Yes |
No |
| Pull requests |
Yes |
No, changes are published directly to the repo |
| Communication |
SSH, HTTPS |
HTTPS only |
| Gists |
Yes |
No, nothing similar |
| Agile planning |
No |
Yes |
| Work item/bug tracking |
Basic |
Advanced |
| Planning tools |
None |
Advanced |
| Wiki |
Yes |
No |
| Clients |
Git Bash (and clients based on CLI, such as TortoiseGit), github:windows, Eclipse plugin, VS 2012 (with Git updates) |
VS 2012 (with Git updates), Team Explorer Everywhere (Eclipse plugin and cross-platform CLI), Git Bash (and clients based on the CLI, such as TortoiseGit) |
| Private Repos |
Pay only |
Unlimited, free for teams up to 5 |
| Public Repos |
Unlimited |
None, not meant for public repos |
| Permissions |
Repo |
Granular |
If you’d like more information about Git, check out Syncfusion’s free Git Succinctly, or O’Reilly’s Version Control with Git .
.
Summary
The addition of Git to TFS as a source control option is very exciting. If you’re used to the way Github or Bitbucket implements Git, you might find this implementation lacking a couple of your favorite features, even though the TFS implementation has all of Git’s features. This may or may not be a deal breaker for you. That you can use either VS or Eclipse or Bash or other Git tools is great, and that users on any OS can use TFS.


