Frankenplanner mashup: Emergent Task Timer + Rocketbook

I’m a big fan of Rocketbook.  I backed their microwaveable Wave on Kickstarter and used it until recently when I backed their dry-erase Color notebook.  I gave Color notebooks to my kids and a niece for Christmas (I haven’t shown them how to scan yet, but grandma’s email is going to be full of love when I do).  I appreciate the reusability of the notebooks, and as a full time home-based remote team member, the scanning app makes it easy to communicate with the rest of my team.  It’s entirely true some of the BFF architecture for Rocket Mortgage was designed using Rocketbooks.

I also like to keep track of what I do during the day.  Since my work is more responsive than planned, I use the Emergent Task Timer from David Seah’s Productivity Tools (thank you Mr. Seah, your tools are wonderful).  This helps me keep on my project allocations, and on really crazy days I can see what I did for standups the next morning.  But, it doesn’t take long before I’ve accumulated a large pile of ETTs and I really don’t need to keep them for very long.  What I needed was a reusable ETT.  So I set out to make a Frankenplanner by fusing an ETT with a Rocketbook page and laminating it.

Rocketbook has some downloads of its pages for free, so I printed one of those out, and experimented with sizes of the ETT.  88% fit just about perfectly, so I printed that on top of the Rocketbook page and laminated it.  Now I have a reusable ETT which I can scan and automatically file using the Rocketbook app!

On the left below is a photo of what the page looks like, and the right is a photo of the scan.  Some colors work better on my lamination than others, but good enough for what I need.

Note to Rocketbook team: Talk to this David Seah guy.  If you make a book full of his productivity tools, I’ll back that, too!  Good for all of us.

Data Quality Problems and RedGate Solutions

I need to reverse engineer a database, but can’t connect my computer to the database server

Data modeling tools can reverse engineer the physical model directly from the database, but often direct access to a database instance is restricted.  This is a perfect case for SQL Clone, where you can quickly clone a database, mask any sensitive data and generate your model from the clone.  SQL Source Control or SQL Compare can also be used to generate a blank database which can be reverse engineered.

Most modeling tools can also reverse engineer from CREATE scripts.  Both SQL Source Control and SQL Compare can be used to generate the scripts needed for this.  SQL Compare can be used in an ad-hoc or ongoing basis to produce scripts in a folder, and SQL Source Control should be updated with every deployment so its scripts are current/

I need to profile my data

Data profiling can be a resource intensive process, and it’s not advisable to run in-depth profiling against a highly transactional database during business hours.  One of the more basic approaches is to use a traditional backup/restore to a location more suitable for profiling.  It works, but this can be time consuming and lacks the ability to hide sensitive data.  SQL Backup Pro might be another option if you need to orchestrate backups and restores for profiling. 

SQL Clone can be used to automate large backups and restores with less space and shorter times.  When used in conjunction with SQL Data Generator can mask sensitive data, making profiling less worrisome. 

Database Documentation

Database documentation is an essential component in data governance, especially if there are a number of disparate systems which suddenly must exchange data.  Systems can use the same term but with different definitions.  SQL Doc can be used to generate  documentation in a number of formats (including GitHub flavored Markdown).  SQL Doc can also be used to add extended properties to tables and columns.  These can be definitions, or identifiers which can be used to map back to an enterprise data dictionary.

sql_variant and unique constraints

One of my database engineer teammates put this little demo together, but she doesn’t blog so she let me most it here (thanks Y.L.!).

Sql_variant is a data type introduced in SQL Server 2008 which allows data of varying types to be stored in the same column in their native types.  Despite its flexibility, sql_variant suffers from some misunderstanding and doesn’t find wide use.

One of the nuances of sql_variant is with unique constraints.  Usually when we apply a unique constraint to a column which is of a single type so we don’t think about the comparison other than the value.  However, when we use a sql_variant, uniqueness is determined by both value and type.

To put this to the test, you can run this little experiment in any version of SQL Server since 2008:

CREATE table #test (GCId SQL_VARIANT, name VARCHAR(10))

CREATE UNIQUE NONCLUSTERED INDEX [UK_test ] ON #test
(
[GCId] ASC
)WITH (PAD_INDEX = OFF, STATISTICS_NORECOMPUTE = OFF, SORT_IN_TEMPDB = OFF,
IGNORE_DUP_KEY = OFF, DROP_EXISTING = OFF, ONLINE = OFF, ALLOW_ROW_LOCKS = ON, ALLOW_PAGE_LOCKS = ON, FILLFACTOR = 70)
GO

insert into #test (GCId, name)
values( ‘2009728366’, ‘varchar’)

insert into #test (GCId, name)
values( 2009728366, ‘bigint’)

SELECT *
FROM #test

–drop table #test

Even with the implicit conversion between bigint and varchar, you can still insert the same value as long as its a different type.  Try re-running the insert and select statements again and see them both fail because the second attempt violates the unique constraint.

This is in no way meant to dissuade the use of sql_variant, but merely to point out one consideration regarding its use.  When it comes to storing data, we need to store data in their correct type.

Prevent Swampification in Your Data Lake

Data lakes have emerged as a promising technology, and continued advances in cloud services and query technology are making data lakes easier to implement and easier to utilize.  But just like their ecological counterparts, data lakes don’t stay pristine all on their own.  Just like a natural lake, a data lake can be subject to processes which can gradually turn it into a swamp.

Causes of Lake Swampification

In the biological world, all lakes become swamps over time without intervention.  This process is referred to as “pond succession”, “ecological succession”, or “swampification” (my favorite).  This process is largely caused by three factors: sedimentation (erosion of hard particulates into the lake), pollution (chemicals which shouldn’t be there), and detritus (“decaying plant and animal material”).  Visually, the process resembles the super slo-mo diagram below.

C9_fig_9.4-aquatic-science-texas

(image and quote from http://texasaquaticscience.org/lakes-ponds-aquatic-science-texas/)

Swamps are ecologically diverse systems, but they can also be polluted and rancid breeding grounds for disease.  Because of this, they can be generally undesirable places, and a lot of effort has been expended to keep pristine aquatic systems from becoming swamps.

To extend the lake metaphor into the big data world, data lakes start as pristine bodies, but will require intervention–clean inputs into the system, handling of sediment and rotting material–to prevent becoming a disgusting data swamp.  IBM agrees, stating

A data lake contains data from various sources. However, without proper management and governance a data lake can quickly become a data swamp. A data swamp is unsafe to use because no one is sure where data came from, how reliable it is, and how it should be protected.

With data lakes, it’s important to move past the concept that data which is not tabular is somehow unstructured.  On the contrary, RAW and JPG files from digital cameras are rich in data beyond the image, there just didn’t exist a good way to query these data.  PDFs, Office documents and XML events sent between applications are other examples of valuable non-tabular but regularly arranged data we may want to analyze.

Causes of Data Lake Swampification

Data lake swampification can be caused by the same forces as a biological lake–influxes of sediment, pollution and detritus:

1. In nature, sediment is material which does not break down easily and slowly fills up the lake by piling up in the lakebed.  Natural sediment is usually inorganic material such as silt and sand, but can also be include difficult-to-decompose material such as wood.  Electronic sediment can be tremendously large blobs with little or no analytical value (does your data lake need the raw TIFF or the OCR output with the TIFF stored in a document management system), or even good data indexed in the wrong location where it won’t be used in analysis.  Not having a maintainable storage strategy covering both the types and locations of data will cause your data lake to fill with heaps and heaps of electronic sediment.

2. Pollution is the input of substances which have an adverse effect on a lake ecosystem.  In nature these inputs could be fertilizer, which in small amounts can boost the productivity of a lake while large amounts cause dangerous algal overgrowth, or toxic substances which destroy life outright.  Because data lakes are designed to be scaled wide, it’s a temptation to fill them with data you don’t want to get rid of, but don’t know what to do with otherwise.  Data pollution can also come from well controlled inputs but with misunderstood features or differing quality rules.  Enterprise data are probably sourced from disparate systems, and these systems may have different names for the same feature, or the same name for different features, making analysis difficult.

3. Detritus in a natural lake is rotting organic matter.  In a data lake, maybe it’s data you’re not analyzing anymore, or a partially implemented idea from someone who has moved on, or a poorly documented feature whose original purpose has been forgotten.  Whatever the cause, over time, things which were once deemed useful may start to rot.  Schema evolution is a fact of business–data elements in XML system event messages can be renamed, added or removed, and if your analytics use these elements, your analysis will be difficult or inaccurate.  There may also be compliance or risk management reasons controlling the data you should store, and data falling outside those policies would also be sediment.  Also, over time, the structure of your “unstructured data” may drift.

As factors affecting the quality of data in your lake, you can plot a declining “data quality curve” (mathematical models are being developed and may be covered in a future blog post).  Fundamentally, the goal is to keep the data quality curve relatively horizontal.  Below is an example of a mis-managed data lake, undergoing swampification.
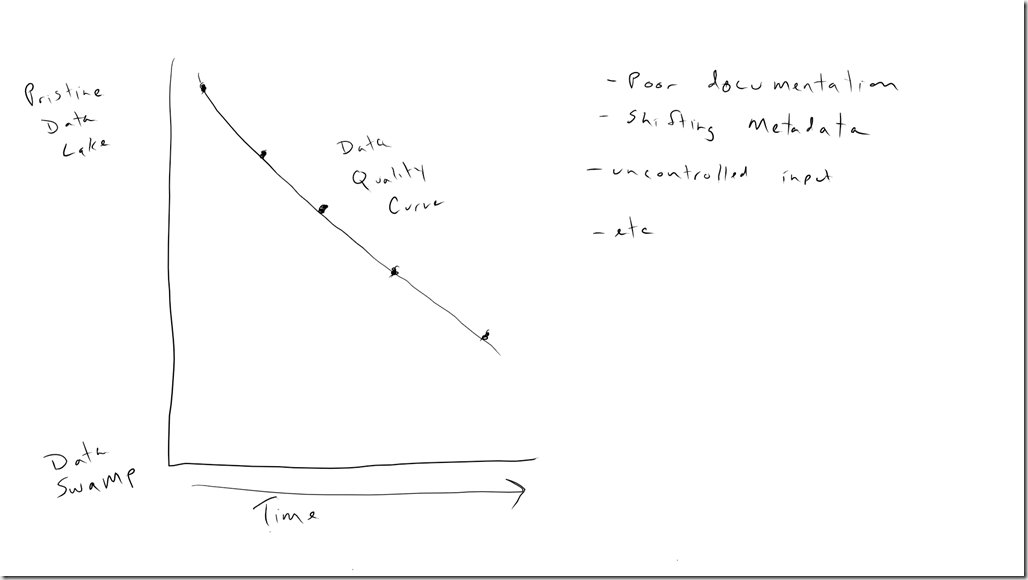
Swampification

Preventing and overcoming swampification

1. Have a governance policy regarding the inputs to your data lake.  A data lake isn’t a dumping ground for everything and anything, it’s a carefully built and maintained datastore.  Before you get too far into a data lake, develop policies of how to handle additions to your data lake, how to gather metadata and document changes in data structures, and who can access the data lake.

2. Part of a governance policy is a documentation policy, which means you need an easy to use collaboration tool.  Empower and expect your team to use this tool.  Document clearly the structure and meaning of the data types in your data lake, and any changes when there are any.  The technology can be anything from a simple wiki, to Atlassian’s Confluence or Microsoft’s SharePoint, to a governance tool like Collibra.  It’s important the system you choose is low friction to the users and fits your budget.  Past recommendations for data lake were to put everything in Hadoop and let the data models evolve over time.

3. Another part of a data governance policy is a data dictionary.  Clearly define the meaning of the data stored and any transformations in your data lake.  The maintenance and use should be as frictionless as possible to ensure longevity.  Have a plan for the establishment and the ongoing maintenance of the data dictionary, including change protocols and a responsible person.  If there is an enterprise data dictionary, that should be leveraged instead of starting a different one.

4. Explore technologies with the ability to explore schemas of what is stored and enforce rules.  At the time of this writing, the Azure Data Lake can use PowerShell to enforce storage rules (e.g., “a PNG is stored outside of the image database”) and to explore metadata of the objects in the data lake.  As the data lake ecosystem grows, continue to evaluate the new options.

5. Regularly audit metadata.   Have a policy where every xth event message is inspected and the metadata logged, and implement .  If the metadata differs from expected, have a data steward investigate.  “A means of creating, enriching, and managing semantic metadata incrementally is essential.”8

For some clarity, PWC says

Data lakes require advanced metadata management methods, including machine-assisted scans, characterizations of the data files, and lineage tracking for each transformation. Should schema on read be the rule and predefined schema the exception? It depends on the sources. The former is ideal for working with rapidly changing data structures, while the latter is best for sub-second query response on highly structured data.8

Products such as Apache Atlas, HCatalog, Zaloni and Waterline can collect metadata and make it available to users or downstream applications.

6. Remember schema evolution and versioning will probably happen and plan for it from the beginning.  Start storing existing event messages in an “Eventv1” indices, or include metadata in the event which provides a version so your queries can handle variations elegantly.  Otherwise you’ll have to use a lot of exception logic in your queries.

7. Control inputs.  Maybe not everything belongs in your lake.  Pollution is bad, and your lake shouldn’t be viewed as a dumping ground for anything and everything.  Should you decide to add something to your data lake, it needs to follow your processes for metadata documentation, storage strategy, etc.

8. Sedimentation in a natural lake is remediated by dredging, and in a data lake that means archiving data you’re not using, and possibly having a dredging strategy.  Although the idea behind a data lake is near indefinite storage of almost everything, there may be compliance or risk reasons for removing raw data.

When effort is put into keeping a data lake pristine, we can imagine our data quality curve is much flatter.  There will be times when the cleanliness of our data lake is affected, perhaps through personnel turnover or missed documentation–but the system can be brought back to a more pristine state with a little effort.
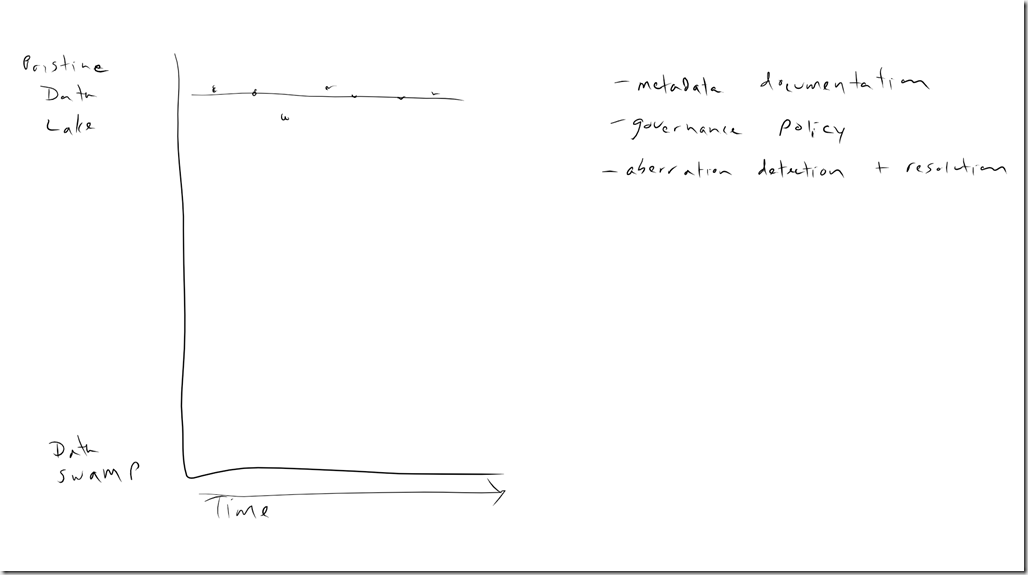
not swampifl ation

Additional Considerations

Just as a natural lake is divided into depth zones (limnetic, lentic, benthic, etc.), a data lake the data in a data lake needs a level of organization also.  Raw data should be separated from cleansed/standardized data which should be separated from analytics-ready data.  You need these different zones because, for example, customers usually don’t enter their address information in a standardized format, which could affect your analysis.  Each of these zones should have a specific security profile.  Not everyone needs access to all the data in the data lake.  A lack of proper access permissions is a real risk.

Implement data quality and allow the time for all data to be cleansed and standardized to populate that zone.  This isn’t easy, but it’s essential for accurate analysis and to ensure a pristine data lake.

It may also be beneficial to augment your raw data, perhaps with block codes or socioeconomic groups.  Augmenting the original data changes the format of the original data, which may be acceptable in your design, or you may need to store standardized data in a different place with a link back to the original document.

Additional resources:

1. http://timoelliott.com/blog/2014/12/from-data-lakes-to-data-swamps.html

2. http://www.gartner.com/newsroom/id/2809117

3. http://data-informed.com/4-ways-to-avoid-a-data-swamp/

4. http://www.reltio.com/about/news/2016/4/how-to-keep-your-data-lake-from-becoming-a-data-swamp

5. https://www.ibm.com/developerworks/community/blogs/5things/entry/5_things_to_know_about_avoiding_a_data_swap_with_a_data_reservoir?lang=en

6. Zaloni Bedrock – http://www.zaloni.com/products/bedrock/

7. http://gethue.com/

8. http://www.pwc.com/us/en/technology-forecast/2014/cloud-computing/assets/pdf/pwc-technology-forecast-data-lakes.pdf

9. http://blog.zaloni.com/metadata-is-critical-for-fishing-in-the-big-data-lake

10. http://www.infoworld.com/article/2923875/big-data/3-ways-the-data-lake-is-actually-not-helping-with-it-agility.html

11. http://www.infoworld.com/article/2920116/analytics/5-ways-real-time-will-kill-data-quality.html

12. https://www.oreilly.com/ideas/tips-for-managing-metadata-in-a-data-lake

10 Reasons You Need SQL Prompt 7

I put a lot of thought into doing the least amount of work possible, and you should too.  That’s not to say I’m lazy–quite the opposite–it’s to say we all need to put some time into working smarter.  Working smarter is one of the reasons I’m such a fanboy of RedGate’s products, both for my .NET as well as my SQL Server and MySQL work.  One of my favorite tools is SQL Prompt, an SSMS plugin that adds “missing” functionality, or has similar features which work better.  Either way, if you use SSMS, SQL Prompt will make your life better.  Here are 10 reasons how:

1. Better snippets.  How many times do you start with “Select * From” or “Select Top 100 * From”?  How often do you love typing all of that, each time, over and over and over again?  Work smart with SQL Prompt, and type “ssf” or “st100” followed by any key, and have those commands auto-expanded for you.  You can even easily make your own snippets, or grab one from the community repository at https://github.com/gvohra/sqlpromptsnippets.

ssf

It’s true that since 2012, SSMS has also had snippets, but working with them is clunky.  Here’s how to insert a snippet, and here’s how to create one.  Ugh.

Pro tip: Try the “yell” snippet.

2. More intelligent IntelliSense.  As with snippets, SQL Prompt has a better implementation of an existing SSMS feature.  IntelliSense is Microsoft’s trademark for the “what we think you mean to type next” feature, and in .NET it’s a great implementation.  In SSMS, the implementation isn’t as smooth.

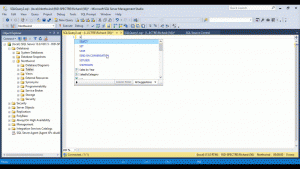
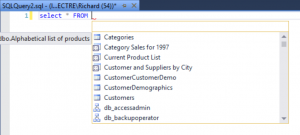
SSMS’ Intellisense orders everything alphabetically–user tables and views are mixed in with system objects.  This will get annoying fast if you’re a down-arrow user, or if your tables start with the same letters as system objects.

2016-08-16_17-12-49

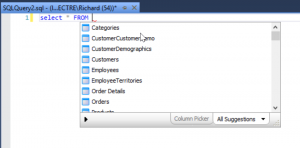
In contrast, SQL Prompt groups objects by type, then alphabetically.  All user tables are listed first, arranged alphabetically.  Then user views, system objects, and so on.  The suggestions are filtered in the same way as you type the object name, making it very quick to select what you need with only a few keystrokes.

2016-08-16_17-11-53

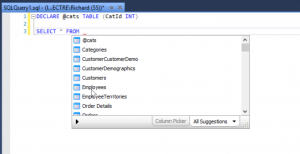
SQL Prompt is also alias-aware, and will make suggestions for temporary tables and procedure variables, including table variables.

2016-08-16_23-23-08

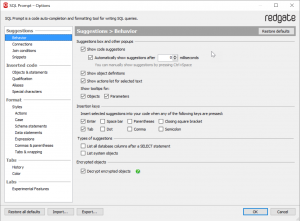
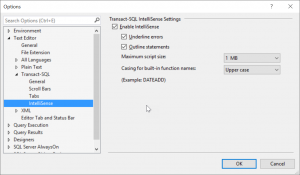
SQL Prompt gives you more options for its behavior that SSMS’ Intellisense, also.

2016-08-16_17-14-21 2016-08-16_17-14-40

3. Query reformatting.  When writing .NET code, Ctrl+K, Ctrl+D “prettifies” the code–fixing indents, line breaks, and so on to improve readability.  The same key combination in SSMS is reserved, but doesn’t reformat a query (apparently it’s a feature in the “text editor” only).

SQL Prompt makes it happen in the query editor with Ctrl+K, Ctrl+Y.  There are all kinds of options you can turn on, but one of my favorites is “Expand Wildcards” (off by default, enable at SQL Prompt >> Options >> Format/Styles/Actions).  Undo (Ctrl+Z) reverses the formatting, like it should.

format

4. Copy as IN clause.  Something else we do when debugging–copy a set of values, reformat it somehow to make a list, then paste it in another query.  We all have our ways of reformatting, from query magic to macros in text editors.  None of that is needed anymore–SQL Prompt adds a menu extension for “Copy as IN clause”, where a selected column of values can be copied and pasted into a query.

5. Open in Excel.  Excel is the world’s #1 BI tool, and is commonly used for data debugging and profiling.  Rather than “Copy with Headers” on your resultset, you can now just open he results directly in Excel.

6. Script as INSERT.  When testing or debugging, I’ll often take the results of a query and reformat them so I can insert them into an temp table, then use that temp table as part of the next validation step, and so on.  This feature greatly simplifies my process by creating an INSERT statement with a temp table and all the selected values in a new tab as soon as you choose this option.  This is a very intelligent feature–you can select a single value, multiple values, or the entire resultset and the ensuing INSERT statement will be accurate.

7. Colored tabs per connection.  SSMS lets you color the status bar for each connection (server and database), which means you know which tab you need just by the color (unless you’re the kind of person who has eight bazillion tabs open at once, not much anyone can do there).  For me, I color code by server, and local=blue, test=green, beta=yellow, and prod=red.  Tab colors FTW!

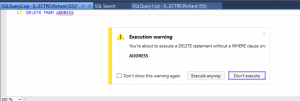
8. Execution warnings.  I’m sure you’ve never forgotten a WHERE clause in an UPDATE or DELETE statement, just the same as I never have.  Yeah, I’ve never done that…  Because I’ve never done that, I actually write these statements backwards, starting with the WHERE clause, just to make sure I put one in.

Here’s the feature which may save your butt, big-time.  Would have been great to have when I executed a few queries of notoriety.

2016-07-28_23-20-59

9. Matching object highlighting. Want to see everywhere an identifier (column name, alias, etc) is used? Select any instance, and all the other instances of that identifier are highlighted. Click on whitespace to unhighlight.

sql-prompt-highlight-matching-objects

(I stole this picture from the release notes at http://www.red-gate.com/blog/building/sql-prompt-7-2-released-sql-server-management-studio-2016-support-new-features).

10. Development as a stand-alone product.  SSMS features are added with new versions of SSMS, every 2-ish years.  SQL Prompt is a stand-alone product and adds dozens of useful features during those intervals.  You can see teh SQL prompt release notes at http://documentation.red-gate.com/display/SP7/Release+notes+and+other+versions to get an idea of what a “point release” can include.  Beta features are public months in advance–see http://www.red-gate.com/blog/redgate-products/why-support-and-upgrades-matter for an example of how much is going on at all times.

In conclusion: work smart, my friends.  Some of these features are in the SSMS base product, but SQL Prompt does a better job, and some of these features are unique to SQL Prompt.  If SQL Prompt can do this (and more) for just writing queries, imagine what the whole SQL Toolbelt can do for your entire database development process–writing, source control, testing and deployment.  There is no reason to do any of that half-assed.

Running Ubuntu Linux Binaries on Windows 10 Build 14316

Not April Fool’s Joke

As announced at Build 2016, Windows 10 will be able to run Ubuntu binaries via bash directly on Windows 10.  This isn’t a VM, or an emulator, or a container or Cygwin—these are ELF binaries running natively on Windows (if you remember the days of MS-DOS and how it also had a CP/M runtime, this is analogous).  This isn’t the full Linux kernel—Windows still handles hardware I/O, and this doesn’t include any of the Linux UIs.  Just a very rich set of binaries you can access via the bash* command line.

Making it Work

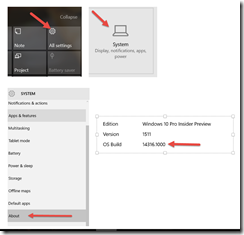
First, you need to be on build 14316.  Build 14316 was released to the fast ring on 4/6/2016, so depending on your sped of getting and applying Windows updates, it might be a while before you see it.  If you don’t know what build you’re running, you can check in All Settings >> System > About >> OS Build.

version

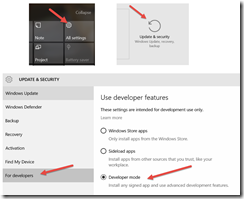
If you have the right build, you next need to enable “Developer mode”, which allows you to install applications and features which are less fully baked.  To do this, go All Settings >> Update & security >> For developers >> Developer mode.

enable_dev

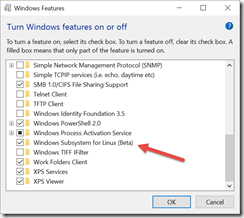
Finally, you need to install the Windows Subsystem for Linux feature.  Do do this, go Control Panel >> Programs >> Turn Windows features on or off (under Programs and Features section).  Select “Windows Subsystem for Linux (Beta)”.

feature

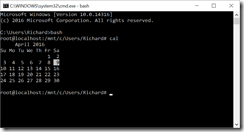
You can now run bash by opening a command prompt and typing “bash” (you may have to reboot after adding the feature above).  The first time you do this, bash will be installed, but subsequent times bash will just start.  You’ll also have a new “Bash on Ubuntu on Windows” entry in All Programs you can pin to the Start menu and save you the command prompt.  Once you see the # prompt (meaning you have superuser privileges in bash) you’re ready to roll.

bash

Additional Resources

Scott Hanselman – Developers can run Bash Shell and user-mode Ubuntu Linux binaries on Windows 10

Dustin Kirkland – Ubuntu on Windows — The Ubuntu Userspace for Windows Developers and HOWTO: Ubuntu on Windows

Channel 9 – Linux Command Line on Windows

Russ Alexander and Rich Turner – Running Bash on Ubuntu on Windows!

If you’re new to the Linux command line, I highly recommend this book, I’ve learned a lot and it’s not painful to read:

* TIL: bash stands for “Bourne Again Shell”, named for its originator Steve Bourne.  I learned that from the above book!

Setting Up Neo4j on Azure VM

NB: I’m leaving this up for continuity purposes, but MS Open Tech no longer exists, so the VM Depot is no longer being updated (see https://msopentech.com/blog/2015/04/17/nextchapter/).  Newer versions of Neo4j will need to be installed the usual way using VMs.

It’s time for me to get back to experimenting with different datastores and data structures (and burn some Azure credits I’m basically wasting).  One datastore I’m interested in for my day job is the graph database Neo4j.  Relationships are fascinating to me, and a graph database stores relationships as data you can query.  There are DBaaS (managed, cloud-based Neo4j) providers such as graphstory, but for getting started and learning it’s probably cheaper to set up your own instance, and here I’ll show you one way to get up your own instance.  Fortunately, Neo Technology (the company behind Neo4j) created a VM image on Microsoft’s VM Depot, which we can use to spin up an Azure VM .

  1. Obviously, you need an Azure account.  If you don’t have one, you need to create one.  Despite the promise of “Free Account”, running VMs is not free on Azure, and the cheapest option for me was $13/month (prices at https://azure.microsoft.com/en-us/pricing/details/virtual-machines/#Linux).   It’s not terrible, especially if you remember to turn off your VM when you’re not using it.  The day job gets me MSDN credits, and anyone in the same boat can probably run a small VM without worries.
  2. It would also be a good idea to know some Linux, because that’s the OS.  If you don’t know the difference between SSH and LTS, you might want to pick up a used copy of Ubuntu Unleashed for 12.04 LTS for a buck or so.  It’s scary thick, but don’t panic, it’s organized well enough to be used as a reference.
  3. In order to publish a VM Depot image to your Azure account, you need a PublishSettings file (which is similar to a WebDeploy file, if you know what those are).  Just click https://manage.windowsazure.com/publishsettings/index?client=xplat and save the file locally.  You don’t need to do anything else, even though there are additional instructions on the page.
  4. Find the Neo4j Community on Ubuntu VM.  This VM is Neo4j 2.0.1 and the current Neo4j is 2.3, so it’s a little behind but good enough as a sandbox.  (This link might change if the Ubuntu OS or Neo4j version are updated, so if it’s broken let me know and I’ll update this post)
  5. On the VM Depot page, click the “Create Virtual Machine” button.  If you haven’t logged in you’ll be prompted to do so, and then you’ll need to provide your PublishSettings file.
  6. Next you’ll get to choose your DNS name, VM username and a few more options.  Pay attention to the ADVANCED settings, the default machine size will cost you about $65/month.  This would be a good time to scale it down a bit.  This is also a good time to change default ports for Neo4j or SSH if you want to.
  7. Now wait about 10 minutes for everything to get set up.  The publish process is a background process, and once it’s complete you’ll get an email if you close the window.

Once you get the confirmation, you’re now ready to start using Neo4j!

Take the Roast Out of the Oven with Rock Framework

As the saying goes, there is no problem which can’t be solved by adding another layer of abstraction.  If you’ve ever sweated making a choice between two products—loggers like Loupe or Splunk, SimpleDB or DynamoDB, for instance—and one of the main drivers of making the “right” choice was the pain of switching, maybe you should have spent some time looking into a layer of abstraction.  Slow starts to projects are often due to paralysis-via-analysis.

A framework is just such a layer of abstraction.  Frameworks are well designed set of code which allow you implement or switch relatively easily between different different choices of the same thing.  Concerns about the “right” choice can be answered with “don’t sweat it, we’ll implement a factory so we can use any log provider, or even different log providers based on severity”, or “no sweat, we’ll encapsulate all our data calls in a data provider, so we just need to replace the one class if we switch databases”.  With the right layers in place, you’re liberated to try a few different options, easily implement the best tool for the job, and not worry too much about future changes.

Frameworks might be the high level of abstraction we need, but how does this usefulness get here?

Where Do Frameworks Come From?

We developers all start somewhere, and aside from prodigies, we all start at level of “procedural code”.  We write big long procedures that get the job done.  Very quickly we learn how to break chunks of code into methods, and then classes.  This is the basis of OOP and confers all the benefits OOP is known for.

Library abstraction comes from working with a number of similar applications, seeing commonalities between these applications, and creating a set of classes of only the commonly used code.  This set of classes is a library, and managing libraries in several applications creates problems while solving others.  The hassle of managing libraries is why NuGet, npm, pip and other “package managers” were created.  Libraries are usually tied closely to the set of applications they were developed for.

Nearing the top level of developer thought development is framework abstraction.  Frameworks employ design patterns (such as provider, factory and abstract factory) which enable components to be very easily swapped around.  Frameworks aren’t supercharged libraries, they’re really meant to be super-generic libraries, encapsulating very common activities (such as logging) into a generic form.  Good applications will use one or more generic frameworks in addition to one or more libraries specific to that application set.

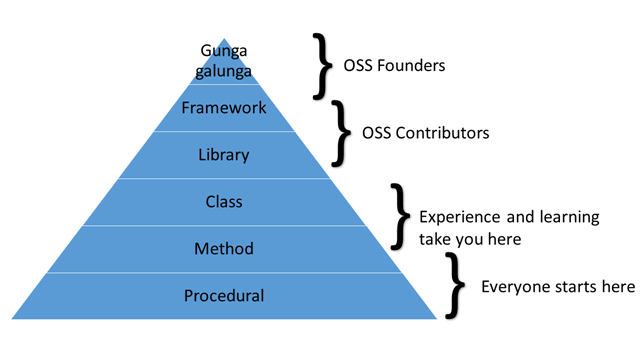
I’ve illustrated this all with a handy-dandy PowerPoint Smart Art:

frameworks

Note: there is no scientific basis for the above diagram, I totally made it up.  But I believe it to be as accurate as anything else I make up.  If you don’t know what “gunga galunga” means, see https://www.youtube.com/watch?v=TkLH56VlKT0.

Why Use a Framework?

Gaining the experience to develop a framework can take a lot of time, in addition to the time it takes to actually develop the framework.  Starting with an existing framework (especially an open source one) allows you to leverage common experiences (i.e., someone else already crossed the bride you’re about to) and speeds your time to SOLID code.  Your application will implement best practices from the start, leading to faster maturity of your application.  The flexibility a framework provides sets you up for success by making change easy.

Using an existing framework means you’re participating an ecosystem which welcomes contributions, and becoming a contributor moves you up a level or two on the pyramid above, and helps ensure the longevity of the project.

Why Rock Framework?

The Rock Framework is literally “developed by dozens, used by hundreds”.  We use Rock Framework internally in hundreds of applications, and have open-sourced the parts we can share.  We have a saying at QuickenLoans—“take the roast out of the oven”.  It means don’t spend too much time thinking about a problem, it’s better to try some things out.  The Rock Framework gives us all the basic plumbing to easily try things out, plus some nice syntactic sugar we like to use in our applications.

Rock Framework is available as several NuGet packages, and the source code is hosted on GitHub, both of which you should access via http://rockframework.org/.  Here, I’ll describe the packages available now.  Other features and packages will be added in the future so be sure to refer to http://rockframework.org/ for the most up-to-date information.

Rock.Core

This is the base package for the Rock Framework, and is a dependency for the other RF modules.  It contains XSerializer (a non-contract XML serializer), a wrapper for Newtonsoft’s JSON.NET, a dependency injection container, a wrapper for hashing, a number of extension methods, and more.

Rock.Logging

This is probably the module with the most immediate use.  All logging methods are encapsulated, and there is a provider model with several interfaces for different types of log messages.  You’re encouraged to extend both your internal implementation as well as our repo with providers for popular logging platforms.

Rock.Messaging

If you’re planning to implement  message queuing between applications (using MSMQ, RabbitMQ or named pipes, for example), this library contains message primatives as well as routers, parsers and locator classes to get a full featured messaging system up and running in very little time.  If you use the interfaces you’ll be able to easily swap providers if you’re taking some for a test drive.

Rock.StaticDependencyInjection

Last, but not least, here is a DI framework which forms the basis for swappable parts in the Rock Framework libraries. Applications have entry points (like Main()) where dependencies can be wired up when the application starts.  Libraries, on the other hand, don’t have entry points, meaning libraries need to be created and have values set in a constructor or other composition root by the application which uses the library.

Rock.StaticDependencyInjection enables libraries to automatically wire up their own dependencies, even with the ability to automatically find the proper implementation of an interface and inject that.


Get Involved with Rock Framework

This post has just been an overview of the Rock Framework.  There are more to come, both from myself and other members of the community.  Follow https://twitter.com/rockframework for announcements.  Even, better, get involved!  As an open source project, Rock Framework has many needs:

  1. Contribute providers for your favorite logging tool
  2. Create an example
  3. Implement the framework in one of your projects
  4. Write or update documentation

In today’s market, there is no better way to level up your career than to contribute to open source projects like this.  We’re looking forward to working with all of you!

Two New OSS Library Releases from QuickenLoans

Today is our annual Core Summit.  The teams led by Keith Elder are showing off what they’ve created for the rest of us to use, and Keith made a couple of really exciting announcements about some of our core libraries–QL Technology has now open-sourced two of the frameworks we use to build our amazing applications!  We’ve pulled out all the proprietary and internal-use-only bits, leaving all the core goodness you can use to “engineer to amaze” also.  While Keith is still attending to his duties at the summit, I thought I’d provide a small amount of clarity on what we’ve done.

One note: QuickenLoans hasn’t been part of Intuit since 2002, we just have a long term agreement to use the name.  Please don’t ask me about TurboTax, QuickBooks, etc.  However, if you need a mortgage, I’ll be more than happy to get you $500 back at closing and refer you to the best bankers in the business, just ping me.

Rock.Framework

The name is a tip-of-our-hats back to our original name, Rock Financial (in 1999, Intuit bought Rock Financial and rebranded it as QuickenLoans, then sold QL back to the original Rock Financial group in 2002).

Internally, we use RF for serialization, queue-based messaging, service creation, centralized logging (don’t see your favorite provider–please contribute!) and dependency injection, all of which are now open sourced.  We have a bunch of internal extensions which we won’t release, and you should also do the same for your applications.  The Core, Logging, Messaging and DependencyInjection libraries are all available as different nuget packages, so you can pick and choose as you need.  DI deserves a special shout-out, since Brian Friesen has been speaking for years on DI and has created a wonderful library.  Brian’s XSerializer XML serializer (so flexible, such fast, much XML) and our JSON.NET wrapper also have their own packages.

Scales

QL has dozens of websites, all of which need to comply with our look-and-feel standards.  Based on holidays and promotional events, the look and feel may need to be updated throughout the year.  Yay, CSS updates!  For those, Dave Gillhespy developed Scales, which allows you to easily standardize your UI elements across your responsive web applications (be it one, or many).

Scales uses SASS for a CSS preprocessor, and implements a number of best practices and simplifies a bung of pain points.  Scales right now is available as a Bower package, but nuget and other options coming in the future.  If you’re interested, contribute themes, enhancements and help resolve issues.

At QuickenLoans, we use a lot of OSS tools, and we’re committed to giving back to the OSS community.  You’ll see blog posts and conference sessions from many of us at QL Technology.  Meantime, follow the team members below for announcements and the latest info.  And if you’re really interested in engineering to amaze, let me know, at the time of writing we have a lot of open positions.

Thanks due to:

Blinking an LED with Raspberry Pi 2 and C# Mono

This should work with either a Raspberry Pi B+ or a Raspberry Pi 2.  The B+ and 2 identical, save for the faster processor and increased RAM on the Pi 2.  I’m assuming you’ve gone through the setup and can boot to a command prompt or the GUI, and are using the Raspbian distro.  For most of this post, you’ll need the command line to install the different libraries, although Monodevelop is a graphical IDE.  We have to use an older version of Monodevelop (3.x), but it’s all good enough.

I have a CanaKit Raspberry Pi 2 Ultimate Starter Kit, which includes a nice breadboard and pinout connector, but greatly lacks for manuals.  This made it really tough for me to get started.  As I found out later, the pinouts are the same as other connectors, so their examples will work also.  The CanaKit does have the nice extra sets of 3.3V and 5V pinouts, which should come in handy for some uses.  Overall it’s a great kit, and I’m glad I bought it, and I hope this post helps others in the same situation.

The flashing LED is the Hello, world of GPIO (General Purpose Input Output), but it’s still pretty exciting the first time the light flashes.  Here’s how I got the LED to flash with C# and Mono.

Step 1: Install Mono and Monodevelop

At the command line, issue the following commands

sudo apt-get update

sudo apt-get upgrade

sudo apt-get install mono-complete

sudo apt-get install monodevelop

Update is used to update all of the package sources for Raspbian, and upgrade brings all your installed packages to their latest versions.  The  first install command installs just the mono runtime, and the second one installs the actual IDE.  You can develop Mono without Monodevelop, but the IDE makes life easier.  Collectively these commands install a lot of stuff, so this all could take several minutes to run. Apt-get is an application/package manager, and is part of the inspiration for nuget and chocolatey.

Once this is done, open Monodevelop and make sure it starts.

Step 2: add nuget to Monodevelop

Nuget, if you don’t know already, is a package manager for .NET.  It makes adding and maintaining dependencies much easier.  The dependencies we need are hosted on nuget.org.  The API which Monodevelop will use to search and retrieve packages is HTTPS, so we need to update the certificate store.

mozroots –import “sync

Next, install the nuget add-in by following the instructions at https://github.com/mrward/monodevelop-nuget-addin for Monodevelop 3.0.  This will now allow you to add nuget references for solutions.

Step 3: Write the program

Start by opening Monodevelop and creating a new project.  If you’re familiar with Visual Studio, this will seem very familiar.  Name your project whatever you want.

In order to access the GPIO pins of the Raspberry Pi in C#, we’ll use the Raspberry.IO.GeneralPurpose library.  We’ll reference this package from nuget by right-clicking the References node, and choosing Manage Nuget Packages (see below; if you don’t see this option, something went wrong in Step 2, look back and make sure you followed the installation completely).

image

In the Manage Packages window, search for Raspberry, select Raspberry.IO.GeneralPurpose and click Add.

image

The code sample we’ll use is based on the example at https://github.com/raspberry-sharp/raspberry-sharp-io/wiki/Raspberry.IO.GeneralPurpose.  Since there are two ways to number the GPIO pins (physical numbering, and CPU address), and since only some pins are actual i/o, it can be a little confusing when coding and wiring.  Sticking to the physical pins numbering is probably easiest, and your connector board should  have shipped with a decoder card which shows the pins.  If not, most boards have the same numbering, so anyone’s should do.  For more details, see Appendex 1 at http://www.raspberrypi.org/documentation/usage/gpio/.  Raspberry.IO.GeneralPurpose limits us to addressing only the i/o pins, so that can be a useful guide, too.

Below is the complete main.cs for our project.  If you’re copying and pasting, don’t forget to change the namespace to match your solution.

using System;
using Raspberry.IO.GeneralPurpose;
using Raspberry.IO.GeneralPurpose.Behaviors;

namespace blinky
{
	class MainClass
	{
		public static void Main (string[] args)
		{

		// Here we create a variable to address a specific pin for output
		// There are two different ways of numbering pins--the physical numbering, and the CPU number
		// "P1Pinxx" refers to the physical numbering, and ranges from P1Pin01-P1Pin40
		var led1 = ConnectorPin.P1Pin07.Output();

		// Here we create a connection to the pin we instantiated above
		var connection = new GpioConnection(led1);

		for (var i = 0; i<100; i++) {
			// Toggle() switches the high/low (on/off) status of the pin
			connection.Toggle(led1);
			System.Threading.Thread.Sleep(250);
		}

		connection.Close();

	}
	}
}

Step 4: Wire the breadboard

Do this part with your I turned off and power disconnected!  Also, touch some metal and try to get rid of any static electricity you’ve built up.  Here’s what you’ll need:

  • LED
  • 220-ish Ohm resistor
  • Two jumper wires, preferably different colors

The resistor is needed as a precaution, so we don’t accidentally burn out a pin.  A Raspberry Pi is capable of producing output currents greater than its inputs can handle.  Normally, a bunch of things like LEDs and other peripherals wired together will use enough current that it won’t matter, but for this simple task it’s better to be safe than sorry.  My kit has 220 Ohm resistors, yours may have different ones, just as long as you have something in the same range.  For a great explanation and refresher on resistors, watch https://www.youtube.com/watch?v=UApKArED3JU.   The while video is 3:23 but explains what I’ve just said even better and shows you how to calculate and read a resistor.  My Canakit also included a nice decoder card for reading resistor codes.  If you don’t have a card, check out http://en.wikipedia.org/wiki/Electronic_color_code.

The jumper wires are so you can move the stuff to a different part of the breadboard.  You can probably bend and twist the LED and resistor so you can directly wire the components, but using jumpers allows you to spread out a little more on another part of the board.  If you want a little background about a breadboards, here’s a 6 minute video: https://www.youtube.com/watch?v=q_Q5s9AhCR0.

Here’s a photo of my board, and the wiring steps.  Do this while the board is not connected to the Pi.

  1. The red wire runs from Pin 7 (GPIO 4) to an empty row on the breadboard
  2. The resistor connects the red row to another empty row.  Make sure to orient the resistor correctly.
  3. The long end of the LED is in the same row as the output end of the resistor.  The short end of the LED is in yet another empty row.
  4. The white wire connects the end of the LED to Pin 6 (GPIO GND), but you can use any GND.

20150316_201106643_iOS

Step 5: Run the program!

Connect the breadboard to the Pi, boot up to a command prompt, and change directories until you’re in the same folder as your .EXE (remember Linux paths are case sensitive).  Access to the GPIO pins requires superuser level, so you’ll need to run the binaries from the command line, using sudo:

sudo ./blinky.exe

You should be good to go!


References

A book I found to be very helpful is Make: Getting Started with Raspberry Pi.  Highly recommended if you don’t have a book already.

I owe a huge debt of gratitude to the authors of the blog posts listed below, in addition to any links above.  I am very lucky people more knowledgeable than I am are paving the way for my curiosity.

http://www.maketecheasier.com/write-c-sharp-programs-raspberry-pi/

http://logicalgenetics.com/raspberry-pi-and-mono-hello-world/

http://blogs.msdn.com/b/brunoterkaly/archive/2014/06/11/mono-how-to-install-on-a-raspberry-pi.aspx

https://github.com/mrward/monodevelop-nuget-addin

https://monomvc.wordpress.com/2012/03/06/nuget-on-mono/